Wednesday, December 5, 2018

Manipulatives to Build and Model Understanding


Hello, Math Friends ⛄, so glad you are here!

I was looking over the Standards that we have coming up within the next month or so and thought it might be a great idea to include specific ways that you can use manipulatives to help your students BUILD their conceptual understanding and MODEL their understanding of one of the Standards in the Module. Remember, this is just one manipulative paired with one Standard for each of the grade levels -- there are so many ways to make learning concrete by using manipulatives to help your students build and model their understanding -- it is both CRITICAL and endless in its possibilities! (be sure to check out using Cuisenaire Rods in the November edition of MathSnack).

...and, you won't want to miss the Math in Practice suggestions given for each grade level, too!


PRE-K and KINDERGARTEN
Two-Color Counters
(P)K.CC.C.6
Identify whether the number of objects in one group is greater than, less than, or equal to the number of objects in another group, e.g., by using matching and counting strategies.1
DROP and COMPARE
  • Give pairs of students up to 20 counters (the quantity can be adjusted to meet the learning level of the students within each pair)
  • Have students drop the counters into a box or other container (to keep them from getting all over the place!)
  • Have students match each red with a yellow counter until they run out of one color
  • Ask students to say a comparative statement that matches their counters:
    • "There are more red than yellow"
    • "There are fewer yellow than red"
    • "I have the same number of red as yellow"
    • "There are two more red than yellow"
    • "There is 1 less red than yellow"


GRADE 1
Two-Color Counters
1.OA.C.6
Add and subtract within 20, demonstrating fluency for addition and subtraction within 10. Use strategies such as counting on; making ten (e.g., 8 + 6 = 8 + 2 + 4 = 10 + 4 = 14); decomposing a number leading to a ten (e.g., 13 - 4 = 13 - 3 - 1 = 10 - 1 = 9); using the relationship between addition and subtraction (e.g., knowing that 8 + 4 = 12, one knows 12 - 8 = 4); and creating equivalent but easier or known sums (e.g., adding 6 + 7 by creating the known equivalent 6 + 6 + 1 = 12 + 1 = 13).


DROP EQUATIONS with two-colored counters
  • Give pairs of students a small bowl/cup with up to 20 counters (adjust to fit students' learning levels)
  • Students take a handful of the 20 counters (they do not have to use all 20 of the counters)
  • Students drop the counters in a box or other other container (less of a mess)
  • Students sort the counters into red and yellow groups
  • Students count the counters in each group
  • Students write an equation (see attached worksheet or simply use dry erase boards) to match the counters ----  the image above could by 4 + 8 = 12
  • Students pick up the counters and returns them to the cup/bowl
  • Student takes a new handful and continues dropping, sorting, counting, and creating equations. 
  • At the end of the activity, bring students together to share one of their equations as you chart the various equations that students created 
  • For an added mathematical element have students model the shared equation using their counters -- this reverses the thinking process from the original activity -- students start with an equation to build the model rather than writing an equation from a model
🌟Get a copy of the Drop Equation workspace shown above by clicking HERE :) 


GRADE 2
Base Ten Blocks
2.NBT.A.3
Read and write numbers to 1000 using base-ten numerals, number names, and expanded form.
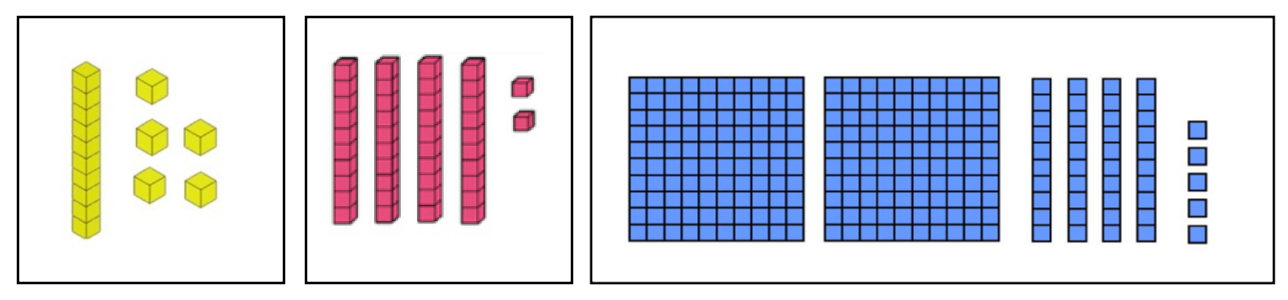

BASE TEN MODELS
Use base ten blocks to create models of numbers


  • Give pairs or small groups of students base ten blocks (lots of them!)
  • Ask students to create a model to show 15 using the base ten blocks
    • note that some students may count out 15 single unit cubes -- this IS a correct way to model 15 -- use questioning to help the student find a more mathematically efficient way to build the model
  • Next, ask students to model the value of 42 using the base ten blocks
  • Ask, "If we count each small square on all of the rods and then also count the two unit cubes, how many cubes would we have altogether?" (42)
  • Ask, "How many "ones" do we have?" (2)
  • Ask, "How many "ten rods" do we have?" (4) "What quantity do 4 ten rods represent?" (40)
  • Write the number 42 on the board. Help students to understand that the 2 in 42 represents the 2 unit cubes and the 4 in 42 represent the 4 ten rods which is equal to 40 unit cubes if we break the rods into unit cubes. 
  • Give more practice with double-digit numbers if needed. 
  • Now ask students to model 245 using the base ten blocks. 
  • Ask, "If we count each small square on the flats, and each small square on the rods, and then count the five unit cubes, how many cubes will we have in all?" (245)
  • Follow-up this guided practice with a partner game: 
    • Ask students to create a model of a 2- or 3-digit number using the base ten blocks.
    • Tell students to write the value of the model on a dry erase board without letting their partner (or small group) see the number. 
    • Have the partner(s) calculate the value of the model. 
    • See if the values match. Discuss as needed.
    • Students change roles.  


GRADE 3
Square Tiles
3.MD.D.8
Solve real world and mathematical problems involving perimeters of polygons, including finding the perimeter given the side lengths, finding an unknown side length, and exhibiting rectangles with the same perimeter and different areas or with the same area and different perimeters.


UNDERSTANDING AREA & PERIMETER USING SQUARE TILES (Modules 5 & 8)

Building Understanding
  • Give each student/pair/team12 square tiles (this may depend on the number of tiles you have - TIP: Cheez-It crackers make great tiles, too!)
  • Ask students to create a rectangle using all 12 of the tiles
  • Ask, "Was there only one way to use all 12 tiles to make a rectangle? Look around to see if you can find a team that created the rectangle differently than your team?"
  • Ask, "How many tiles did you use to make your rectangle?" (12)
  • Say, "Because we all used 12 tiles, we say that our rectangles have an AREA of 12 square tiles.  It doesn't matter if you made a long, skinny rectangle (2 by 6 or 12 by 1) or if your rectangle was almost a square (3 by 4) - all of our rectangles are 12 square units because we used 12 tiles to make the rectangle."
  • Ask, "What IF we used 24 tiles? What would the area of our rectangle be?" (24 square tiles)
  • Ask, "What IF we used 100 tiles? What would the area of our rectangle be?" (100 square tiles)
  • Say, "So the area of the rectangle is determined by the number of same-sized tiles that we use." 
  • Say, "Look at the rectangle you created using the 12 square tiles. We are going to count all of the edges that are not touching another tile." (Note: It may be helpful to use a document camera or to have an image projected on the screen to MODEL HOW to count the edges).
  • Ask, "Let's make a prediction: Do you think that every rectangle we made will have the SAME number of edges?"
  • Allow time for students to consider your question. 
  • Ask students to discuss their ideas with their partner/team. 
  • Ask students to count their edges. 
  • Ask students to tell you the number of edges they counted. Record all responses.
    • 14, 16, 16, 26, 14, 14, 14, 15, 16, etc.... (note: 15 is not a correct response - do not correct it at this time, simply record)
  • Show all three of the possible models using 12 tiles 
  • Ask students to identify the model they created and to tell how many edges they counted.
  • Write the number under the model.
  • Ask, "What do you notice?" 
    • each model has the SAME area, but DIFFERENT perimeter
    • all of the people who said "14 edges" created the 3 by 4 rectangle
    • students who did not say "14", "16", or "26" miscounted and may need assistance to better understand how to count the edges
Expanding Understanding 
  • Say, "Listen to this story about Claudia who is building a garden. When I am done telling you about Claudia's garden, you will use the square tiles to build what Claudia's garden might look like."
  • Say, "Claudia's garden is 24 square feet. It is a rectangle-shaped garden. What could Claudia's garden look like? Build it?" (TIP: Write the mathematical information on the board)
  • Give students time to contemplate, discuss, and build (and rebuild as needed)
  • Have students discuss the various ways they built Claudia's garden as you model their ideas on the board or by using tiles under the document camera.
  • Ask, "What is the AREA of the garden that each of you created for Claudia?" (24 sq. feet). "How do you know?"
  • Say, "Claudia wants to put a fence around her garden so the animals do not eat her vegetables. Will all of these gardens need the same amount of fence?"  Give time for students to think about your question. 
  • Say, "Calculate how much fence Claudia needs if she builds her garden like the one you built with your tiles."
  • Allow plenty of time. Encourage students to compare and discuss with others. Help students to notice that gardens that are built the same will have the same area AND perimeter. Gardens that are built with different dimensions will have different perimeters even though the area is still 24 square feet. 
Modeling Understanding
  • Say, "I want you to use the square tiles to build a garden that has an area of 20 square units and a perimeter of 42 units."
  • Ask, "How many tiles will you need to use?" (20)
  • Ask, "How did you know you would need to use 20 tiles?" (because the area tells you how many tiles to use)
  • Say, "Okay, work with your partner/team to build a garden that has an area of 20 and a perimeter of 42." 
  • Give time to trial and error. Circulate around the room observing and asking questions that help students build their understanding. 


GRADE 4
Snap Cubes
4.NF.B.3.D
Solve word problems involving addition and subtraction of fractions referring to the same whole and having like denominators, e.g., by using visual fraction models and equations to represent the problem.

MIXED NUMBER ADDITION WITH SNAP CUBES

  • Have the following scenario posted and read it aloud to the class: "Makala is making a recipe that calls for 2-4/5 cups of apple juice and 1-2/5 cups of water. How much total liquid is in the recipe?"
  • Ask, "What is this story about? Not what math are we supposed to do, just what is the story about?" (Makala is making a recipe that calls for two different amounts of liquid and we are trying to determine the total amount of liquid needed). 
  • Say, "Let's use our snap cubes to help us visualize this problem."
  • Ask, "What do you notice about the quantities used?" (fractions/mixed numbers)
  • Ask, "When we look at the fractions, how many parts are needed to make a whole?" (5 - remind students as needed that the denominator determines how many parts are needed to make a whole).
  • Say, "Go ahead and build a snap cube train that represents 1 whole using 5 cubes." 
  • Give time and walk around checking and asking guiding questions as needed. 
  • Say, "I notice that Makala needs 2 whole cups and a little more of apple juice. How can we represent the 2 whole cups?" (build 2 trains of 5 cubes each)
  • Say, "How much more apple juice does she need?" (4/5) "How can you represent that?" (making a train of 4 instead of 5)
  • Students should now have a representation of 2-4/5 (2 trains of 5 and 1 train of 4)
  • Say, "Remember, in the story, Makala also needed 1-2/5 cups of water. Use more snap cubes and build a representation of the amount of water she needs." (1 train of 5 and 1 train of 2)
  • Ask, "How many cubes are needed to represent 1 whole cup of liquid in this scenario?" (5) "How do we know that it is 5?" (the denominator tells how many makes the whole)
  • Say, "Look at your snap cube models. How many whole cups of liquid are needed for this recipe?"
    • If students say "3", ask them if they have enough cubes to combine the shorter cube trains to make a train that represents one whole. 
    • If students say "4", ask them to explain how they arrived at 4 whole cups.
  • Ask, "After we have made all of the whole cups that we can, how many cubes are leftover?" (1)
  • Ask, "How many do we need to make another whole cup?" (students may say 5 as the total needed for a whole train or they may say 4 as the number of additional cubes needed)
  • Ask "So if we have 1 remaining, what fraction does that 1 represent?" (1/5)  Ask students to explain WHY it represents 1/5 (because we need 5 to make a whole in this scenario and we only have 1 of the 5 that are needed).
  • Create additional stories to reinforce the concept. There is no need to use large whole numbers which can become cumbersome to model; small whole number values and smaller denominator values will be just as effective in helping students to build their conceptual understanding.


GRADE 5
Two-Color Counters
5.OA.A.1
Use parentheses, brackets, or braces in numerical expressions, and evaluate expressions with these symbols.

BUILDING BASIC MODELS OF COMPLEX EXPRESSIONS
For this activity, stick with small number values so the intended learning is not overshadowed by the task of counting out large quantities of counters. 

Building Understanding
  • Ask students to use the two-colored counters to model 3 + 4 (students should put out 3 red and 4 yellow, or vice versa).
  • Ask students to adjust their current model so it shows 1 + 4 (students should simply remove 2 of the 3 same colored counters)
Expanding Understanding
  • Post this expression on the board for students to see:  2 x ( 1 + 4) 
  • Say, "Do not touch your counters, yet. Think about what this expression might mean."
  • Allow think time
  • Say, "Think about how you could use the counters to model this new expression." Give some think time. 
  • Say, "Let's talk about this new expression. What do you notice?" 
    • there are parentheses
    • there is a multiplication symbol
    • there is an addition symbol
    • 2x means "two groups of", so we need "2 groups of 1+4"
  • Say, "We already have one group of 1 + 4 modeled from our last activity. How can we change it to be two groups of 1 + 4?" 
  • Discuss and then ask students to show you the model for 2 x (1 + 4)  --- students should have 1 red/4 yellow and then another set of 1 red/4 yellow (remember red/yellow can be reversed as long as the 1 is represented by the same color in both sets and the 4 is represented by the same color in both sets)
  • Say, "Let's try another one. Clear your counters."
  • Write 3 x (2 + 4) on the board. Ask students to model this expression.
  • Discuss, question, and guide as needed.

Modeling Understanding
  • Show students the following model using counters under the document camera or a prepared slide on the SmartBoard. 

  • Ask students to WRITE an expression that matches your image. Below are some of the expressions that students may generate. 
  • Give plenty of time for students to think and discuss in small groups. 
  • Encourage students to come up with multiple ways the model can be written as a mathematical expression. 
  • Ask students to share their ideas as you write them on the board.
    • 15 + 6
    • (5 + 2) x 3
    • 3 x (5 + 2)
    • (3 x 5) + (3 x 2)
    • 21
    • 3 x 7
    • ... and probably other ideas that deserve your classes time and effort to explain
The most valuable part of this activity will be the discussion as to WHY the expression represents the model.  If a student offers an incorrect/different expression than expected, do not discourage the solution; instead, ask the student to explain. In most cases, the student will self-correct if needed :) 


Thursday, November 1, 2018

Cuisenaire Rods


If you have a set of Cuisenaire rods handy, this would be a GREAT time to take them out and USE them as we "play" with ideas about using Cuisenaire Rods for mathematical instruction. If you don't have any Cuisenaire rods readily available, borrow a set of rods from your intermediate grade level classrooms (sets of them were sent this past summer). In the meantime, you can click one of the links below to access an interactive website for Cuisenaire Rods (using physical rods is far better if you have them available!)


STAGES & PHASES

Most students (and teachers) have very little experience using Cuisenaire rods for mathematical instruction.
ALL STUDENTS should begin at the beginning. Even our older students (and their teachers!) need to begin by having free play with the Rods before trying to "do something" with them.  As you continue reading, look for activity ideas indicated by this icon 🔺.


GETTING STARTED with FREE PLAY

When introducing math manipulatives, an essential first step is to allow the students some free play with them. Free play should be, just that, free. Giving specific directions or over-organizing this initial activity destroys the essential character of free play. It takes a certain amount of faith to stand by watching children building towers and making animal pictures from the rods - especially when the construction seems to have no particular mathematical significance, but the time to explore will pay off in the end (I promise!).

Free play gives teachers a chance to observe their students' creativity and problem-solving skills and allows for informal conversations about what they see. As students "play", they learn to make choices in regards to which rods to use – this will be an invaluable skill when they use Cuisenaire rods later during instruction.

Using the math manipulatives during free play is time well-spent, but it doesn't have to happen just during the precious little time you have for math instruction; you might decide to offer the manipulatives that will be used later in the week/month for free play on a rainy day during indoor recess or perhaps as part of a brain break activity.


DEVELOPING AN UNDERSTANDING OF EQUIVALENCE

After taking time to explore the Cuisenaire rods in a free play setting, the first concept you will want to formally tackle is equivalence. Your students should have opportunities to sort, name, order, and use equivalence to form various patterns using the rods. A simple way to begin is to place a pile of Cuisenaire rods in front of students and ask them, "What do you notice?" Give them a bit of time to touch and explore. Do not end this exploration time too soon. Be patient. Encourage small groups to talk. Then stand back and watch the ideas about equivalence pour out:
"Two red rods are the same length as 1 purple rod."
"Three white rods are the same length as 1 green rod."
"A red rod and a green rod together are the same as 1 yellow." 
"If the white rod is 1, then the yellow rod is 5." 


FORMALIZING YOUR EXPLORATION

You've given time for free play and some time to just "notice". Now let's take a look at specific activities you can use in your classroom to develop your students' number sense and their ability to use the Cuisenaire rods to solve math problems. 


🔺Place the YELLOW ROD in front you. How many ways can you make a length that is equivalent to the yellow rod? Can you think of any other ways that are not shown on the graphic to the right?


🔺Which single rods are equivalent to doubles of another? How many combinations can you find?  Do you notice any patterns? Can we predict which rods can be made with a double?


DEVELOPING AN UNDERSTANDING OF THE WHOLE

Cuisenaire rods are excellent tools for developing flexible thinking. A major component of using the Cuisenaire rods effectively is being mindful of "the whole". The whole can change with each question and understanding what represents the whole helps to bring meaning and context to the rest of the rods. Because the whole is not always the same color rod, it forces us to think more flexibly and to constantly assess the value of each rod in terms of the whole. The whole can even be made of two or more rods that have been pushed together (crazy, I know!).

🔺 If the blue rod is one whole, which rod represents 1/3? How do you know? What is another way you can know? 


🔺 If the red rod represents 1/3, which rod represents the whole? What question did you ask yourself to begin answering this question? 


🔺 If the whole is the orange rod and red rod pushed together, which rod represents 1/2? What strategy did you use to determine the answer? What other strategy could be used?


🔺 A train that is made from two rods has an equivalent length to brown. If one of the rods is yellow, what color is the other rod? (equivalence)
How would having physical rods help you to discover that the other rod must be light green?


🔺 Make a train with 2 rods: One of the rods is half the length of the other rod. What does the train look like? What is the fractional value of each color rod in this model as compared to the whole? What other combinations of rods could be used to build a different train with the same parameters? (fractions)
How would having physical rods help you to discover that there are multiple representations? Is there a pattern to the rods that can/cannot be used to build this train? Notice how using the rods makes the complex idea that the light green (which is 1/2 the length of the dark green) represents 1/3 of the whole. 


🔺 What is 10 divided by 4? How does this model demonstrate the quotient? (division with fractional quotients)
Do you see the solution of 2½ in the model below?  The orange rod is 10 units. The purple rod is 4 units. We needed 2½ purple rods to equal the same length of one orange rod.


🔺 Is 21 a multiple of 3?  How does the model below help you to know?  (multiples)
🔺 Is 21 a multiple of 4?  How does the model below help you to know?  (multiples)
Notice that the value of 21 was made from 2 ten rods (orange) and a 1 rod (white).
How does the model below help you to see that 21 is a multiple of 3, but not 4? 


🔺 Is 3 a factor of 21? How does the model above help you to know?  (factors)
🔺 Is 4 a factor of 21? How does the model above help you to know?  (factors)
How does the model shown above help you to see that 3 IS a factor of 21, but 4 is not? 


🔺 What is the sum of 3/5 and 1/3. How do you know?  (fractions)
How does this model help you to see that the sum is 14/15? 

🔺 The area of a rectangle is 56. One side of the rectangle is 7 units. What are the lengths of the other sides? (geometry)
How does this model help you see that the lengths of the sides are 7, 7, 8, and 8?


🔺 What is 1/2 of 1/3? Use the image below (or better yet, build the model!) to find the solution. (fraction calculation) 
How does this model help you see that 1/2 of 1/3 is 1/6? 


(NOTE: be sure that "fit to page" is NOT checked when printing)


SOME VIDEO LINKS for PROFESSIONAL GROWTH


Thursday, October 4, 2018

Planning with the Math in Practice book

Professional Development Opportunity - Added 1/17/19


Original post October 2018

This past summer, our school district bought a copy of this book for every K-5 math teacher in every one of our elementary schools. It was a BIG investment that we believe will pay big dividends in enhanced instruction and a boost in student performance.  As I write this entry today, we are only on Day 22 of school and my copy of the book already has a dozen or more Post-It notes sticking out of the pages. If you haven't "gotten the pages dirty" in your copy, I'd love to take you on the grand tour of this terrific teacher resource that will fast become your "go to" resource for planning your instructional lessons. 


Before we begin the tour, here's a quick 1-2-3 guide for how I plan lessons using our county resources (no scouring the Internet for ideas or using TPT is ever necessary):

  1. I begin by looking at our county's Instructional Organizer to see which Standards are covered in the current instructional Module. I make a few decisions about the order in which I want to present the Standards. Then I focus my attention on the Standards that will be addressed within the lesson I am planning (remember, Learning-Focused lessons focus on one or two Standards that span 2-4 days. So when I am planning, I must think about a series of connected activities that lead to an understanding of the Standard(s) and help students to answer the Essential Question of the lesson - I am not thinking about just tomorrow's instruction).
  2. The next thing I do is use the Common Core Mathematics Companion book to read more about the Standard(s) for which I am planning because my own understanding of the Standard is a key ingredient to a successful lesson. This book is a great resource that gives an explanation of what the Standard means in terms of classroom instruction - in plain English with everything I need to know about the Standard on just one or two pages! On those pages, I always find a nice bullet list of the teacher and student actions and a brief section that describes common misconceptions and errors that students make when working with this Standard (this is perhaps my favorite part of the Common Core Companion book).
  3. Once I fully understand WHAT I will be teaching, I then dive into the Math in Practice book to see HOW I can teach the Standard.  Why do I love this book so much? Well, besides the content being spot-on for instructional planning, it is organized in a way that is easy to read without cramming too much on a page or making me wade through unnecessary text to find exactly what I need to effectively plan a lesson. The Math in Practice book makes use of photos, graphics, side notes, and text features (like color and italics) to indicate what the teacher should say and do during the instructional lesson. 

Check out these comments from your CCPS colleagues – 


Okay, grab your copy of Math in Practice and let's Explore....

Table of Contents - You may notice that the Table of Contents is not organized by Common Core domain names and it will, of course, not run page-by-page with our pacing and instructional organization of the Standards, so just look for the topic among each of the modules listed in the Math in Practice book.

Introduction Pages - Be sure to browse the introduction pages where you will find information about the book, an explanation of the icons used, information about formative assessments and vocabulary development, and, best of all, a key code that will provide you with access to many wonderful online resources that are referenced in the book.

 About the Math - Each Module (chapter) begins with a section entitled "About the Math". This section offers an overview of the topic and the key ideas of the Module to get your head wrapped around the topic before you dive in. 

Ideas for Instruction and Assessment - "This section presents lesson ideas, practice tasks, and assessment options. You will not find scripted lessons in this book, since lesson planning should be specific to your students' needs and abilities. What you will find are lesson ideas to get you thinking about what to teach and ways to teach it" (quoted from page 6 Math in Practice). You're going to love this section of the book because this is where you will find specific lesson ideas. Written in blue are prompts to guide you in what to do and then written in italicized font are specific question prompts that you can ask to guide your students during each activity. 

⚄ Side Notes & Graphics - Be sure not to miss the side notes found on most pages. These side notes offer invaluable information on how to differentiate the activity, alternate methods of presenting the information, key vocabulary that should be developed, links to electronic resources, common misconceptions and errors to watch for, and tips for effective and efficient instruction. It's a really thick spiral-bound book, but it is not overburdened by text; instead, the essential text that it contains is supported by photos, student work samples, ideas for anchor charts, and a wide array of other colorful graphics that simply bring the whole book together as an invaluable resource for planning mathematics instruction.  

Teaching in 2018! - This book has a copyright of @2016 and was written by educators (several of them are from Maryland!). What does that mean to us? Well, the activities and ideas in the book are not only in line with the educational shift of building conceptual understanding, but it also means that the book is in line with the high standards and rigor that we expect here in the state of Maryland.


Wednesday, September 5, 2018

NSR180 - Number Sense Routines

We are so excited about the launch of 
180 Days of Number Sense Routines!


As I write this month's post, it is only Day Two of the school year and our email is already blowing up with excitement!  Last year, we field-tested several Number Sense activities and then this past summer a team of teachers helped to select and write activities to include in our NSR180 initiative for Grades 1-5. During our opening week PD session, we introduced teachers to the activities (there is a specific activity for every day of the school year!). We have already received many emails from teachers across the county who were thrilled to tell us how engaged their students were during the activity and excited about the type of reasoning that was already beginning to take hold in their classrooms. I visited several classrooms yesterday and had an opportunity to see a few classrooms in action - it was exciting to watch teachers and students working together to develop reasoning skills about numbers rather than mindlessly following a procedure to produce the solution! I talked to several teachers who were thrilled with how their first Number Sense session using the Estimation activity went with their students. Just take a look at a few of the emails we received after the first day (!) of teachers trying NSR180 with their students.


* I smiled when I noticed how many of you like to call your students "my kiddos"!


Our countywide discussion on the topic of developing our students' Number Sense is nothing new. We have been building our collective capacity to understand the importance and value of teaching Number Sense through numerous professional development sessions, school-based PLC sessions, and professional book recommendations. We have even featured several of the routines that have become a part of our NSR180 right here on MathSnack:


Our opening days have featured the Estimation routine. Estimation is a critical skill that we use every day when we do math in the real world beyond the classroom walls.  Think about it... when you go to the grocery store and see that grapes are on sale for $1.99/pound, do you say, "Hey, if I buy 3 pounds that will be $5.97 or do you just estimate that it's about 6 bucks? Yeah, me too!


On Day 4 of NSR180 (that's this Friday), we will switch to the Number Talks routine. You can learn more about conducting a Number Talk (and see video of several Number Talks in action!) simply by clicking on the links and reviewing the October 2016 and November 2017 MathSnack posts featuring the topic of Number Talks.  Your Media Center also has a few copies of Sherry Parrish's book Number Talks. Remember, though, the specific Number Talk string is already planned for you in your NSR180 slides. 


Estimation JUST for FUN!
What does $1 million dollars look like in stacks of 100 dollar bills? 
C'mon... play along.... What do you think 1 million dollars looks like when stacked in 100 dollar bills? Use the $10,000 and the $1,000,000,000 representations shown above to help you make an estimate based on some rough calculations. 

(an image of 1 million dollars is shown below - but don't scroll down, yet - play along)


One TRILLION dollars is written like this: $1,000,000,000,000
Can you use your number sense about 1 billion to determine what 1 trillion will look like?
CLICK HERE to see a video -- I wonder if it will look like what you pictured in your mind??? 


By the way...
THIS is 1 million dollars
It could fit in your bookbag with no problem!
...a bit UNDERwhelming to look at, don't you agree?